
Watering
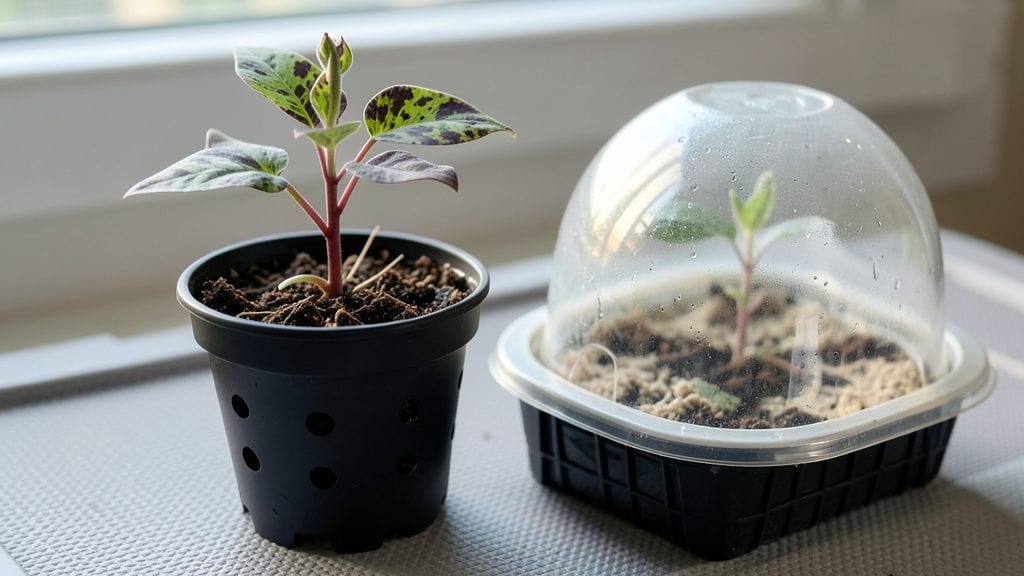
Growing lady's thumb seedlings from seed is one of those gardening shortcuts that actually works—you'll see those first tiny leaves in just 5-7 days, and they're tough enough to handle beginner mistakes.
I still remember the shock of watching my first batch pop up so quickly after years of struggling with slow-starting perennials.
The secret to their speed isn't complicated: keep the soil barely damp (not soggy), maintain temperatures above 60°F, and give them bright, indirect light. Most people overwater, which causes that dreaded damping-off—just a spritz from a spray bottle keeps things moist without drowning the seeds.
You'll need shallow trays, well-draining mix, and patience for 2-3 weeks until they're ready to transplant.
What makes these seedlings special is how they grow: glossy, deep green leaves with those signature red stems that scream "I'm thriving." Once established, they spread like crazy, filling gaps in borders or spilling over containers with that lush, almost tropical look.
The best part? They bounce back from neglect—perfect for gardeners who forget to water or have unpredictable schedules.
Here's where it gets interesting—these seedlings handle transplanting like pros, even when they're still small. The key is hardening them off for just 3-5 days before moving them outdoors, and choosing a spot with partial shade to full sun.
Confession: I've killed more delicate perennials trying to rush this, but lady's thumb forgives mistakes. Let's get those seeds started right.
📚 In This Guide
- What you need
- Instructions
- Tips and common mistakes
- Wrapping up and next steps
What you need
- ● Lady’s thumb seeds: 5–10 seeds (or a small packet for multiple plants). Look for Persicaria polymorpha or Polygonum persicaria seeds—fresh or stored properly.
- ● Seed-starting mix: 1–2 quarts of lightweight, sterile potting soil (avoid garden soil—it’s too dense!). Brands like FoxFarm Seedling Mix or Miracle-Gro Seed Starting Potting Mix work well.
- ● Containers: Small seed trays (with drainage holes) or
- ● Biodegradable pots (2–3 inches deep) or
- ● Yogurt cups with drainage holes punched in the bottom.
- ● Spray bottle: 1 (for gentle watering—avoid over-saturating seeds!).
- ● Clear plastic wrap or humidity dome: 1 sheet (to retain moisture while seeds germinate).
- ○ Grow lights or sunny windowsill: Access to bright, indirect light (6–8 hours/day). A small LED grow light (~10W) is optional but helpful for low-light spaces.
- ● Heat mat: 1 (speeds up germination—ideal for cooler climates).
- ● Fertilizer: A balanced liquid fertilizer (5-5-5 or 10-10-10) for when seedlings sprout.
- ● Tweezers: 1 pair (for delicate seed placement).
- ● Plant labels: 5–10 (to track growth stages!).
- ● Transplanting tools: Small hand trowel or spoon for moving seedlings later.
Step-by-Step instructions for cultivating lady's thumb seedlings
Here’s how to grow vigorous lady’s thumb plants from seed in just weeks—no waiting months for slow germination.
Prepare Containers and Germination Mix
Fill small pots or seed trays with 2-3 inches of a lightweight, sterile seed-starting mix. I prefer a blend that holds moisture but drains freely—nothing heavier than standard potting soil. Press the mix down gently to remove air pockets, then moisten it until it feels like a damp sponge. Avoid oversaturating; you want it evenly damp, not soggy.
Lady’s thumb seeds germinate quickly, so speed is key. I use 2-inch biodegradable pots for each seedling—this prevents root disturbance later. Place the pots in a warm spot, ideally between 70-75°F, to encourage fast germination. A seedling heat mat works wonders if your home runs cooler.
Sow Seeds and Maintain Moisture
Scatter 1-2 seeds per pot just beneath the soil surface—no deeper than 1/8 inch. Press them lightly into the mix to ensure good soil contact. Overcrowding now leads to weak, leggy seedlings later, so spacing matters. Mist the surface with a spray bottle until the soil is uniformly damp, not drenched.
Cover the pots loosely with plastic wrap or a humidity dome to retain moisture and warmth. Check daily for condensation—if the plastic fogs up, you’ve got the right balance. Keep the soil consistently moist but never waterlogged. Within 7-10 days, you’ll see the first tiny sprouts pushing through the soil.
Provide Bright, Indirect Light
As soon as the seedlings emerge, remove the plastic cover immediately to prevent damping-off. Place them under bright, indirect light—a south-facing window or a grow light positioned 4-6 inches above the pots. Direct sunlight at this stage can scorch delicate leaves, so diffuse light is best. You’ll know they’re getting enough light when the seedlings grow sturdy and dark green, not pale or stretched.
Rotate the pots a quarter turn daily to ensure even growth. Leggy seedlings mean the light source is too far or too weak. If stems elongate excessively, move the light closer or supplement with a grow bulb. Within 3-4 weeks, your seedlings will develop 3-4 true leaves, signaling they’re ready for transplanting.
Transplant and Harden Off
Choose a spot with partial to full shade—lady’s thumb thrives in lower-light conditions but can tolerate some sun. Dig holes slightly larger than the root balls and space them 12-18 inches apart to allow for bushy growth. Gently remove each seedling from its pot, keeping the root ball intact, and place it in the hole. Fill in with soil and press lightly around the base.
Water deeply after transplanting to settle the roots. Over the next 7-10 days, gradually acclimate the seedlings to outdoor conditions by moving them to a shaded area for 1-2 hours daily, increasing exposure each day. This hardening-off process prevents shock and ensures strong, resilient plants. Once they’re fully adjusted, they’ll establish quickly and reward you with bold, glossy foliage.
Maintain and Encourage Bushy Growth
Lady’s thumb grows best in moist but well-drained soil. Water deeply once a week, or more often in hot, dry weather, until the top inch of soil feels dry. Overwatering leads to root rot, so always check moisture levels before watering. A balanced liquid fertilizer applied every 4-6 weeks promotes lush, vibrant growth—no heavy feeding required.
Pinch back the tips of new growth when seedlings reach 4-6 inches tall to encourage bushier, fuller plants. This simple step prevents legginess and ensures a compact, dense habit. With minimal care, your lady’s thumb will thrive as a fast-growing perennial, providing year-round interest with its striking foliage.
Tips & tricks for perfect lady's thumb seedlings
Speed is everything when cultivating lady's thumb seedlings—these proven techniques ensure rapid germination and robust growth without the usual delays.
Temperature Matters: Maintain that 70-75°F range consistently during germination. I’ve found a seedling heat mat makes all the difference in cooler homes, especially when nighttime temperatures drop. If your space runs cooler, group pots together to create a microclimate that mimics ideal conditions. The faster seeds germinate, the sooner you’ll have vigorous seedlings ready for transplanting.
The Technique That Changed Everything: In Step 2, when sowing your 1-2 seeds per pot, press them just below the surface with your thumb—not a tool—to ensure perfect soil contact. This simple pressure prevents seeds from floating to the surface during watering, which can delay germination. I also recommend using a spray bottle for moisture control; it delivers gentle, even hydration without disturbing the seeds.
Light Strategy: During the 3-4 week growth phase in Step 3, position your grow light 4-6 inches above the pots and adjust as seedlings grow. I’ve noticed that maintaining this distance prevents leggy growth while still providing sufficient light. Rotate pots daily to prevent uneven growth toward the light source—this ensures all sides develop evenly and creates that bushy habit we want.
Transplanting Wisdom: When transplanting in Step 4, dig holes just slightly larger than the root balls and space them 12-18 inches apart. The extra space prevents competition for nutrients and allows each plant to develop its characteristic bold foliage. After transplanting, water deeply but avoid creating puddles—lady’s thumb prefers moist but well-drained soil, and soggy conditions can lead to root rot.
Pro Tips for Lady'S Thumb Seedling
- Speed is everything when cultivating lady's thumb seedlings—these proven techniques ensure rapid germination and robust growth without the usual delays.
- Temperature Matters: Maintain that 70-75°F range consistently during germination.
- The Technique That Changed Everything: In Step 2, when sowing your 1-2 seeds per pot, press them just below the surface with your thumb—not a tool—to ensure perfect soil contact.
Frequently asked questions
Got questions about growing Lady’s Thumb seedlings? You’re not alone!
Here are some of the most common queries—plus quick, actionable answers to keep your little green friends thriving.
How long does it take for Lady’s Thumb seedlings to germinate?
Lady’s Thumb seedlings are fast growers! With the right conditions (warmth, moisture, and indirect light), you’ll see sprouts in 7–14 days. Keep the soil consistently damp (not soggy) and place the tray in a cozy spot like a sunny windowsill or under grow lights. Patience pays off—tiny leaves will pop up sooner than you think!
How often should I water Lady’s Thumb seedlings?
Overwatering is the #1 killer of seedlings! Water only when the top inch of soil feels dry—about 2–3 times per week, depending on humidity and temperature. Use a spray bottle or small watering can to avoid disturbing delicate roots. Pro tip: Bottom-watering (placing the tray in shallow water for 10 mins) encourages stronger stems and prevents fungal issues.
Can I plant Lady’s Thumb seedlings outside too soon?
Not yet! Wait until all risk of frost has passed (usually after your last spring frost date) and seedlings have 3–4 true leaves. Harden them off first by gradually exposing them to outdoor conditions over 7–10 days. Lady’s Thumb thrives in USDA Zones 9–11 but can be grown as an annual in cooler climates. Choose a spot with bright, indirect light—they’ll reward you with lush, vibrant foliage!
What if my Lady’s Thumb seedlings look leggy or weak?
Leggy seedlings are a cry for light! Move them closer to a sunny window or add a grow light 2–4 inches above for 12–16 hours daily. If they’re already stretched, bury them deeper when transplanting—the lower stems will develop roots! Avoid overcrowding (space them 2–3 inches apart) and thin if needed. With more light, they’ll perk up in no time.
Are there alternatives to Lady’s Thumb for fast-growing greens?
If you love quick-growing, low-maintenance plants, try these seedling-friendly alternatives:
- Swiss Chard: Germinates in 5–10 days, edible greens in weeks!
- Arugula: Ready in 3–4 weeks, peppery and fast.
- Basil: Thrives in warm conditions, great for containers.
- Spinach: Cold-hardy and sprouts in 7–14 days.
Wrapping up and next steps
Growing a lady’s thumb seedling is a rewarding way to add vibrant, low-maintenance greenery to your space—whether indoors or out! 🌱 With its fast germination and hardy nature, this perennial is perfect for beginners and plant enthusiasts alike.
Whether you’re troubleshooting watering woes or prepping for propagation, you now have the tools to nurture thriving plants.
Ready to take the next step? Start with just one seedling and watch it flourish—then share your green thumb success with fellow plant lovers! 🌿💚