
Transplanting
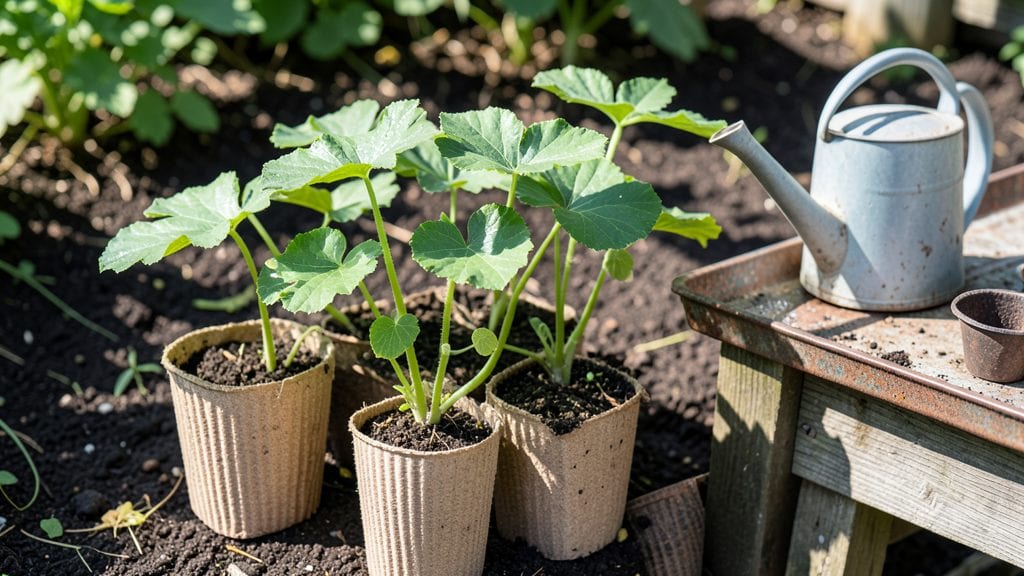
Here are the pumpkin seedlings images you’ll want to study before transplanting—because spotting the right ones can spare you weeks of disappointment (and a sad pile of wilted vines).
The difference between a strong start and a sad pile of compost comes down to a few key visual clues—leaf shape, stem strength, and color—that most gardeners overlook until it’s too late.
Your seedlings should have bold, deep green leaves with jagged edges, not pale or yellowing ones. The stems need to be thick and sturdy—if they look like toothpicks, they’ll snap under their own weight when you transplant.
And the soil around them? Damp but not soggy. These are the plants that’ll turn into 20-pound pumpkins, not the leggy, weak ones that bolt or rot.
Once you spot these traits, you’ll know exactly which seedlings to keep and which to cull. The right ones will grow 3-4 inches tall with 2-3 true leaves before they’re ready to move outside.
That’s when you’ll see them really take off—vines spreading, leaves darkening, and roots reaching deep enough to support their future weight.
This checklist works for both winter squash and summer varieties, whether you’re starting in flats or individual pots. The same rules apply whether you’re in a short-season zone or a long growing area. Master these visual cues, and you’ll never second-guess your seedlings again.
📚 In This Guide
- What you need
- Instructions
- Tips and common mistakes
- Wrapping up and next steps
What you need
- ● Pumpkin seeds: 3–5 high-quality, disease-resistant seeds (e.g., Cucurbita pepo or Cucurbita moschata) per seedling. Check seed packets for variety specifics.
- ○ Seedling containers: 4–6-inch biodegradable pots (or 2–3-inch cells for starter trays) with drainage holes. Optional: Paper towels or damp paper for germination.
- ● Potting mix: 10–15 lbs of seed-starting mix (sterile, well-draining, and peat/coir-based). Avoid garden soil—it’s too dense!
- ● Transplanting site: Full sun (6+ hours daily).
- ● Loamy, well-draining soil with a pH of 6.0–6.8.
- ● Compost or aged manure (mixed into soil at a 1:3 ratio).
- ● Watering tools: Spray bottle (for seedlings).
- ● Watering can with a gentle rose nozzle (for transplanting).
- ● Fertilizer: Balanced liquid fertilizer (e.g., 10-10-10) or organic options like fish emulsion or compost tea. Dilute to half-strength for seedlings.
- ● Garden gloves & trowel: For handling soil and transplanting without mess.
- ● Grow lights or a sunny windowsill (if starting indoors before last frost).
- ● Plastic mulch or black landscape fabric (to warm soil and suppress weeds post-transplant).
- ● Row covers or shade cloth (if your climate is too hot or cold for seedlings).
- ● Stakes or trellis (for vining varieties like Cucurbita maxima).
- ● Label markers (to track varieties if testing multiple types).
How to identify healthy pumpkin seedlings before transplanting
Here's what to look for to ensure your pumpkin seedlings thrive from seed to harvest.
Examine Seedling Stem Strength and Color
Healthy pumpkin seedlings have thick, sturdy stems that appear dark green at the base. Avoid seedlings with thin, pale stems—they'll snap easily when transplanted. I always check for hairy stems (a telltale sign of pumpkin seedlings) and no signs of wilting, which means the plant is properly hydrated.
The first true leaves should appear round and lobed, not jagged or yellowed. If leaves look small and pale, the seedling needs more light. Pumpkin seedlings grow fast, so you'll see new leaves every 3-5 days once they're established. Watch for cotyledons (those first two leaves) dropping off—they signal the plant is shifting energy to true leaves.
Assess Root and Soil Health at the Base
Gently lift the seedling to inspect the root system. Healthy roots are white or pale yellow, not brown or mushy. If roots look dark or slimy, the seedling has been overwatered or suffered from damping-off disease. I always check for roots growing through drainage holes—that means the plant outgrew its container and needs transplanting soon.
The soil should smell earthy, not sour or rotten. Press your finger into the soil near the stem—it should feel lightly moist but not soggy. Overwatered seedlings often have yellowing lower leaves as roots suffocate. If you see white mold on the soil surface, reduce watering immediately and improve airflow.
Verify Leaf Shape and Growth Pattern
Pumpkin seedlings develop large, broad leaves with deep lobes as they mature. Each new leaf should be bigger than the last, indicating steady growth. If leaves are small and clustered tightly, the seedling is light-starved. I position seedlings under full-spectrum grow lights for 14-16 hours daily to prevent leggy growth.
Watch for uniform leaf color—dark green on top, slightly lighter underneath. Yellowing between veins suggests nutrient deficiency, while brown edges mean underwatering or salt buildup. Healthy seedlings also have a slight upward angle in their growth, not stretching toward light or flopping over.
Check for Pest and Disease Signs Early
Inspect the undersides of leaves for tiny webs, holes, or chewed edges—common signs of spider mites or aphids. I run my fingers along stems to feel for sticky residue (honeydew), which attracts ants and signals an infestation. Healthy seedlings have no visible pests and no discolored spots on leaves.
Look for powdery white residue on leaves (powdery mildew) or dark, greasy spots (downy mildew). If you spot either, increase airflow by spacing seedlings 12-18 inches apart and avoid overhead watering. Pumpkin seedlings are tough, but early intervention prevents systemic infections that weaken plants before transplanting.
Test Hardiness Before Transplanting
Two weeks before your last frost date, harden off seedlings by placing them outside in partial shade for 1-2 hours daily. Healthy seedlings will bounce back from this exposure with no wilting. If they droop or lose leaves, they're not ready—extend the acclimation period by 3-5 days. I always transplant on a cloudy afternoon to reduce stress.
After transplanting, monitor for new growth within 7-10 days. If seedlings yellow at the edges after transplanting, they're struggling with shock—water deeply at the base and mulch with 2-3 inches of straw to retain moisture. Strong, healthy seedlings will show vine growth within 2 weeks, signaling they've established roots in their new home.
Tips & tricks for perfect pumpkin seedling transplants
Identifying healthy pumpkin seedlings isn't just about spotting green leaves—it's about understanding subtle visual cues that reveal the plant's true vitality. These practical insights will help you avoid common pitfalls and ensure your pumpkin seedlings thrive from seedling to transplant.
Visual Stem Assessment: When examining stems in Step 1, pay special attention to the hairiness—the fine, silky hairs are a definitive indicator of healthy pumpkin seedlings. Run your thumb along the stem: healthy hairs should feel soft and dense, not sparse or brittle. This characteristic hairiness helps regulate moisture and protects against pests. I also recommend using a small flashlight to inspect stems in low light—you'll notice how the dark green color intensifies when viewed at an angle, confirming proper chlorophyll development.
Root Development Timeline: The roots growing through drainage holes in Step 2 aren't just a sign of being root-bound—they indicate the seedling has developed a strong, fibrous root system. This typically occurs after about 3-4 weeks of growth, but timing varies based on your growing conditions. If you notice this happening earlier than expected, it's a good sign your seedlings are growing vigorously. For optimal transplanting readiness, I've found that seedlings with roots growing through holes but still showing new leaf growth every 3-5 days (as mentioned in Step 1) are at their ideal transplanting window.
Light Exposure Strategy: The 14-16 hours of full-spectrum grow light mentioned in Step 3 is crucial, but don't overlook the importance of light quality. Standard household bulbs won't provide the full spectrum needed for healthy growth. I recommend using LED grow lights with a color temperature of 6500K for optimal photosynthesis. Position the lights about 6 inches above the seedlings and adjust as they grow to maintain this distance. This prevents leggy growth while ensuring the seedlings develop the broad, lobed leaves characteristic of healthy pumpkin plants.
Transplanting Preparation: When hardening off seedlings in Step 5, I've found that gradually increasing the outdoor exposure time by 30 minutes each day yields the best results. Start with the 1-2 hours mentioned, but extend this period over 5-7 days rather than doing it all at once. This gradual acclimation prevents transplant shock. Additionally, I always prepare the transplant site 2-3 days before moving seedlings by loosening the soil and adding compost—this gives the roots an immediate nutrient boost when they're most vulnerable.
Pro Tips for Pumpkin Seedlings Images
- Identifying healthy pumpkin seedlings isn't just about spotting green leaves—it's about understanding subtle visual cues that reveal the plant's true vitality.
- Visual Stem Assessment: When examining stems in Step 1, pay special attention to the hairiness—the fine, silky hairs are a definitive indicator of healthy pumpkin seedlings.
- Root Development Timeline: The roots growing through drainage holes in Step 2 aren't just a sign of being root-bound—they indicate the seedling has developed a strong, fibrous root system.
Frequently asked questions
Got questions about pumpkin seedlings? You’re not alone! Here are answers to the most common concerns—from timing to troubleshooting—to help you grow strong, vibrant plants.
How do I know when my pumpkin seedlings are ready to transplant?
Seedlings are ready when they have 2-4 true leaves (not just the initial seed leaves), are 3-4 inches tall, and have a sturdy stem. Harden them off for 5-7 days first by placing them outdoors in shade for a few hours daily. Avoid transplanting if frost is still a threat!
What’s the best temperature for transplanting pumpkin seedlings?
Pumpkins thrive in warm soil (60-90°F) and air. Wait until the nighttime temperatures stay above 50°F—transplanting too early can stunt growth or invite disease. Use black plastic mulch or row covers to warm the soil faster if needed.
Why are my pumpkin seedlings wilting after transplanting?
Wilting is often due to transplant shock or underwatering. Keep soil consistently moist (not soggy) and avoid direct sun for the first 24-48 hours. If leaves turn yellow, check for root damage or fungal issues—adjust watering or apply fungicide if needed.
Can I transplant pumpkin seedlings in containers instead of a garden?
Yes! Use large containers (at least 5 gallons per plant) with well-draining soil and full sun. Choose compact varieties like ‘Jack Be Little’ or ‘Sugar Pie.’ Containers dry out faster, so water daily and fertilize weekly with a balanced 10-10-10 mix.
How far apart should I space pumpkin seedlings when transplanting?
Spacing depends on the variety:
- Bush types: 3–4 feet apart (they stay compact).
- Vining types: 4–6 feet apart (they spread widely).
- Giant varieties: 6+ feet apart (e.g., ‘Atlantic Giant’).
Wrapping up and next steps
Growing strong pumpkin seedlings is all about observation, patience, and a little green thumb love! 🌱 By now, you’ve got the tools, answers to common questions, and visual cues to spot healthy (or struggling) young plants.
Whether you’re a first-time gardener or a seasoned pro, these pumpkin seedlings images and tips will set you up for a bountiful harvest.
Ready to take the next step? Grab those seedlings, head to your garden, and give them the perfect home. Happy planting—and may your vines grow wild and your pumpkins be plump! 🎃✨