Transplanting
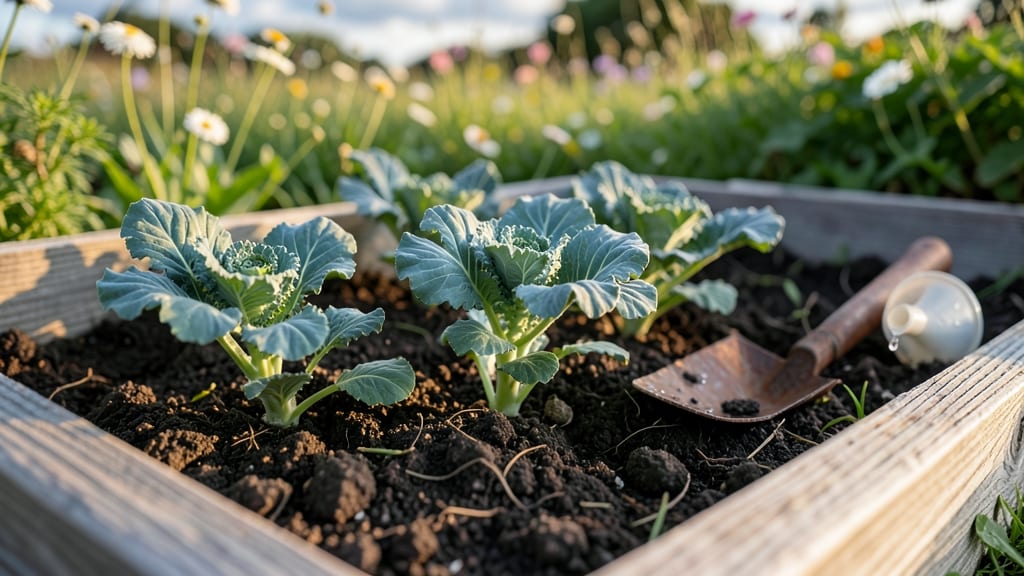
Seeing kale seedlings pictures of those first tiny, rounded cotyledons is your best bet for spotting success early—and bigger harvests later. 🌱 I’ve learned to watch for them closely, because missing this stage means missing the chance to thin properly before true leaves appear.
True leaves arrive in about 10-14 days, and that’s when things get exciting. They’ll be jagged-edged and dark green, growing in a rosette pattern. Seedlings should be spaced 2-3 inches apart at this point—any closer and they’ll compete for light, leaving you with leggy, weak plants.
A pair of scissors and a steady hand is all you need to thin them right.
By week 3, you’ll see those classic kale leaves forming—broad, blue-green, and slightly crinkled at the edges. This is when seedlings start looking like the kale you’ll eventually eat. The key now is keeping them moist but not soggy, and protecting them from pests that love tender young leaves.
Common early-stage issues like damping-off (a fuzzy gray mold at the soil line) can wipe out seedlings overnight. The fix? Sterilized soil, good airflow, and avoiding overhead watering. Once you spot these stages correctly, you’ll know exactly when to act—and when to relax and let them grow.
📚 In This Guide
- What you need
- Instructions
- Tips and common mistakes
- Wrapping up and next steps
What you need
- ● Seeds: Organic kale seeds (choose a variety like Lacinato, Curly Kale, or Red Russian—about 10-20 seeds for a small batch).
- ● Seed trays or pots: Biodegradable peat pots or 2-3 inch cell trays (10-20 units, depending on seed quantity).
- ● Seed-starting mix: Lightweight, sterile potting soil (1 bag, ~10-15 quarts). Avoid garden soil—it’s too dense!
- ● Watering can or spray bottle: With a fine mist setting to avoid disturbing seeds.
- ● Grow lights or sunny windowsill: A full-spectrum LED grow light (12-16 hours/day) or a south-facing window with 6+ hours of sunlight.
- ● Plant labels: Small sticks or markers to track seed varieties and planting dates.
- ○ Humidity dome or plastic wrap: Optional but helpful for retaining moisture (cut-to-fit or store-bought).
- ● Heating mat: Keeps soil warm (70-75°F) for faster germination (highly recommended for cooler climates).
- ● Fertilizer: Balanced, water-soluble fertilizer (e.g., 5-5-5) for seedlings once they sprout.
- ● Tweezers: For delicate seed placement in small pots.
- ● Camera or phone: To snap those adorable kale seedling pictures for your growth journal! 📸
How to identify kale seedling stages visually
Here’s how to track your kale’s progress from sprout to transplant-ready.
🌱 Step 1: Recognize Germination (Days 3-10)
Your first clue is a tiny white bump breaking through the soil—this is the seedling’s root pushing upward. Within 24-48 hours, you’ll see the first cotyledons, those two rounded leaves that look like tiny dinner plates. They’re your confirmation the seed has sprouted and is photosynthesizing.
I keep a magnifying glass handy at this stage because early seedlings are so small. If you’re using a humidity dome, remove it once 50% of seeds have sprouted—condensation on the dome can smother delicate new growth. Watch for pale yellowing on cotyledons, which signals overwatering or poor drainage.
🌿 Step 2: Spot True Leaves (Days 10-14)
The real magic happens when the first true leaves appear—these are the jagged, dark green leaves that look like miniature kale. Unlike cotyledons, true leaves have serrated edges and a more mature shape. This is when seedlings are ready for their first real light source if you’re not using a sunny windowsill.
Here’s the thing—I’ve seen growers mistake leggy seedlings for healthy ones at this stage. If your plants are stretching toward the light with thin stems and leaves spaced far apart, move them closer to the light (within 2-3 inches) or add a grow light. Strong seedlings have thick stems and leaves close together.
⏰ Step 3: Assess Transplant Readiness (Days 21-28)
Seedlings are ready to move outdoors when they have 4-6 true leaves and are at least 3-4 inches tall. Look for deep green color and sturdy stems—these plants can handle the shock of transplanting. The roots should be filling the container but not circling the bottom (a sign they’re root-bound).
Before transplanting, do a hardening-off test: Place seedlings outside in partial shade for 2 hours on the first day, then gradually increase exposure. If leaves yellow or wilt, they’re not ready yet. Kale thrives in cool weather, so aim to transplant 2-3 weeks before your last frost date for the best results.
✂️ Step 4: Monitor Early Growth After Transplanting (Weeks 3-4)
After transplanting, your kale should show new growth within 7-10 days. Look for bushier foliage and stronger stems—this means the plant is establishing roots. If you notice yellowing lower leaves, it’s normal as the plant redirects energy upward. However, if new leaves are also yellowing, check your soil pH (kale prefers 6.0-7.0).
This is when I start thinning seedlings if they’re crowded. Use scissors to snip at soil level rather than pulling—this prevents disturbing roots. Space remaining plants 12-18 inches apart to allow airflow, which reduces disease risk. You’ll see bolting (flowering) in 60+ days if temperatures rise above 75°F, so keep an eye on heat stress.
Tips & tricks for tracking kale seedling growth
These visual cues and practical tips will help you identify each stage of your kale seedlings with confidence—no guesswork required.
Light Source Matters: During Step 2 when true leaves appear, position your seedlings within 2-3 inches of a strong light source. I use a simple LED grow light on a timer for 12-14 hours daily—this prevents leggy growth and ensures compact, healthy seedlings. If using natural light, rotate trays daily so all seedlings get even exposure.
Root Health Check: In Step 3 when assessing transplant readiness, gently squeeze the base of the container. If roots are filling the space but not circling the bottom, they're ready. I've learned the hard way that root-bound seedlings (with roots circling) struggle after transplanting—always check before moving them outdoors.
Hardening-Off Strategy: For the 2-hour outdoor hardening test in Step 3, I start with partial shade and gradually move to full sun over 5-7 days. Watch for leaves that yellow or wilt—they're telling you they need more time. Kale thrives in cooler weather, so if your last frost date is approaching, aim to transplant 2-3 weeks before for optimal growth.
Thinning Technique: When thinning crowded seedlings in Step 4, use clean scissors to snip at soil level rather than pulling. This prevents disturbing nearby roots and reduces transplant shock. I always leave 12-18 inches between remaining plants for proper airflow, which helps prevent fungal diseases in humid conditions.
Pro Tips for Kale Seedlings Pictures
- These visual cues and practical tips will help you identify each stage of your kale seedlings with confidence—no gues...
- Light Source Matters: During Step 2 when true leaves appear, position your seedlings within 2-3 inches of a strong li...
- Root Health Check: In Step 3 when assessing transplant readiness, gently squeeze the base of the container. If roots ...
Frequently asked questions
Got questions about nurturing your kale seedlings? You’re not alone! Here are answers to the most common queries—from timing to troubleshooting—to help you grow thriving plants.
How long does it take for kale seedlings to sprout?
Kale seeds typically sprout within 5–10 days under ideal conditions (warmth, moisture, and indirect light). If you’re using cold-started seeds, germination can take 10–14 days. Patience is key—keep soil consistently moist and maintain a cozy 60–75°F environment. Pro tip: Use a heat mat if your home runs cool!
When should I transplant kale seedlings outdoors?
Transplant kale seedlings outdoors after the last frost when soil temps are above 40°F and seedlings have 3–4 true leaves (usually 4–6 weeks after sowing). Harden them off for 7–10 days first by gradually exposing them to outdoor conditions. Timing matters: Early spring or late summer are ideal for cooler climates!
Why are my kale seedlings leggy or stretching?
Leggy seedlings are usually a sign of too little light. Move them to a sunnier spot (or under grow lights) immediately. If they’re already stretched, bury them deeper when transplanting—the extra soil encourages root growth. Prevent it: Start seeds in a well-lit area and thin seedlings early to avoid competition.
Can I grow kale from store-bought leaves?
Yes! Regrow kale from cuttings by placing the stems (with leaf nodes) in water or moist soil. Keep them in bright, indirect light and change the water every 2–3 days. Roots should appear in 1–2 weeks, and new growth in 3–4 weeks. Bonus: This method works for other greens like chard or bok choy too!
What should I do if pests attack my kale seedlings?
Common pests like aphids, cabbage worms, or flea beetles can damage seedlings. Start with neem oil or insecticidal soap for mild infestations. For severe cases, use row covers or introduce beneficial insects like ladybugs. Act fast: Remove heavily infested leaves immediately to prevent spread.
How do I take good pictures of my kale seedlings for growth tracking?
Use natural light near a window or outdoors on an overcast day for clear shots. Place seedlings on a clean, flat surface (like a white tray) and snap photos from the same angle weekly. Label each image with dates for easy comparison. Bonus tip: A macro lens or smartphone with a good camera works great!
Wrapping up and next steps
Watching your kale seedlings grow from tiny sprouts to vibrant greens is incredibly rewarding! 🌱 With the right care—like proper spacing, sunlight, and soil—you’ll soon harvest crisp, nutrient-packed leaves. Whether you’re a seasoned gardener or just starting, every stage is a step toward a thriving garden.
Ready to take the next leap? Share your progress with fellow gardeners or dive deeper into companion planting to maximize your harvest. Happy growing—your future meals (and Instagram-worthy greens!) are waiting. 🌿