Vegetables
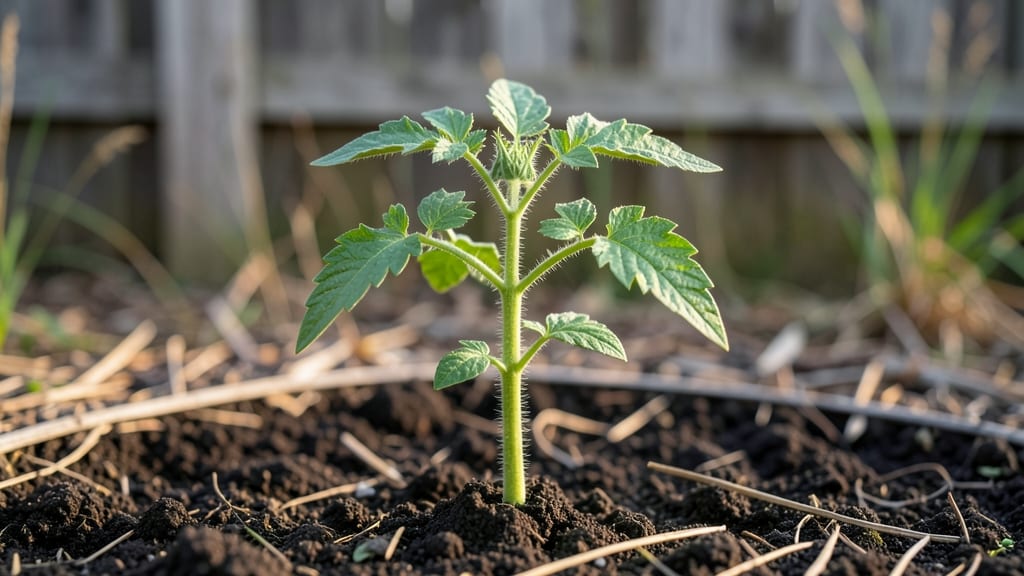
Studying tomato seedling images turns the mystery of growth into a simple, satisfying science—watch as those tiny sprouts stretch, their first true leaves unfurl, and their roots dig deeper. tell healthy from struggling plants.
You’ll recognize each stage by simple visual cues: the tiny loop of a germinating seed, the first leaves that look like tiny ferns, and the sturdier true leaves that signal it’s time to transplant.
I’ve included these exact growth markers in my guide so you can match your seedlings to the right care at every step.
The payoff comes when you see those deep green, sturdy seedlings ready for the garden. You’ll know exactly when to harden them off and transplant, avoiding the common mistakes that lead to leggy, weak plants. No more second-guessing what’s healthy or not.
This works for all tomato varieties—cherries, slicers, heirlooms—whether you’re growing in trays, egg cartons, or solo cups. Let’s get those seedlings thriving from day one.
📚 In This Guide
- What you need
- Instructions
- Tips and common mistakes
- Wrapping up and next steps
What you need
- ● Seeds: Disease-resistant tomato seeds (e.g., heirloom or hybrid varieties like 'Cherry Tomato' or 'Beefsteak'). Buy 5–10 seeds for variety or redundancy.
- ● Seed-starting trays: Biodegradable or plastic trays with individual cells (2–4 inches deep) for easy transplanting. A 10x20 cell tray is ideal.
- ● Seed-starting mix: Lightweight, sterile soilless mix (e.g., coconut coir or peat-based) to prevent damping-off. Avoid garden soil—it’s too dense!
- ● Containers: Small pots (3–4 inches) or yogurt cups with drainage holes for later-stage seedlings (if not using trays).
- ○ Grow lights: LED or fluorescent lights (12–16 inches above seedlings) for 12–16 hours/day. Optional but critical for weak sunlight.
- ● Drainage trays: Shallow trays to catch excess water and prevent root rot.
- ● Misting bottle: For gentle watering (avoid overhead spraying to prevent fungal diseases).
- ● Fertilizer: Balanced liquid fertilizer (5-5-5 or 10-10-10) or organic options like fish emulsion. Dilute to half-strength for seedlings.
- ● Labels & markers: To track seed varieties and planting dates (use toothpicks + masking tape for eco-friendly labels).
- ● Scissors or knife: For pruning leggy seedlings or cutting trays apart.
- ○ Camera or smartphone: A macro lens (optional) or a phone with a high-resolution camera (e.g., iPhone 13+ or Android with 12MP+).
- ● Natural light source: A north-facing window or softbox for even lighting. Avoid harsh midday sun.
- ● Tripod or stable surface: To keep shots steady. A stack of books works in a pinch!
- ● Background: Neutral (white or light gray) or textured (e.g., moss or burlap) for contrast.
- ○ Reflector (optional): A white foam board to bounce light onto seedlings.
- ○ Temperature: Keep seedlings in a warm (70–80°F) environment. Use a seedling heat mat (optional) for germinating seeds.
- ● Humidity: Maintain 50–70% humidity with a plastic dome (remove once sprouts appear).
- ● Ventilation: A small fan on low (2–3 hours/day) strengthens stems.
- ● pH test kit: To check soil acidity (ideal range: 6.0–6.8).
- ● Hydrogen peroxide (3%): 1 tsp per gallon of water to sterilize trays and tools.
- ● Epsom salt: 1 tsp per gallon for magnesium boost (prevents yellowing leaves).
- ● Garden journal: To log growth stages, watering schedules, and photo dates.
- ● Child-safe scissors: If involving kids in the process!
How to identify and track tomato seedling growth stages
Understanding each stage helps you adjust care and avoid common pitfalls.
Recognize the Germination Stage
The first stage begins when you see tiny sprouts break through the soil surface, usually within 5-10 days after planting. These initial leaves, called cotyledons, are your first visual confirmation that germination worked. They look like two small, rounded leaves growing opposite each other.
Here's the thing—don't be tempted to water heavily yet. The soil should stay consistently moist but not soggy. Overwatering now can cause the seeds to rot before they even sprout. You'll know moisture is right when the soil surface looks slightly damp but not glistening.
This stage is critical because it sets the foundation for everything that follows. If you see uneven sprouting, it might mean inconsistent moisture or temperature. I always keep my seed trays on a heat mat set to 75-85°F to speed up this process.
Identify the Seedling Stage (First True Leaves)
Once the cotyledons have been up for about 7-10 days, you'll notice two smaller, more pointed leaves emerging from the stem. These are the first true leaves, and they signal the seedling has successfully transitioned to photosynthesis. This is when the plant starts producing its own food.
At this point, you'll want to move seedlings to a bright light source immediately. A south-facing window rarely provides enough intensity, so I use a full-spectrum grow light positioned 2-4 inches above the plants. Without sufficient light, seedlings stretch desperately upward, becoming leggy and weak.
You'll see strong seedlings have thick stems, deep green color, and compact spacing between leaves. Weak seedlings will have thin, pale stems with leaves spaced far apart. This is the moment that matters: proper light now prevents future problems.
Track the Vegetative Growth Stage
As the plant continues growing, you'll notice the development of compound leaves with multiple leaflets, typically appearing 3-4 weeks after germination. This is when the plant really starts to take off, and you'll see rapid growth in both height and leaf production.
This is also when I start paying close attention to the roots. If you gently remove a seedling from its container, you should see a healthy network of white roots. If the roots are circling or looking cramped, it's time to transplant into a larger container or individual pots.
During this stage, you'll want to fertilize lightly with a balanced, water-soluble fertilizer diluted to half strength. Too much fertilizer now can burn tender roots. Look for signs of nutrient deficiency like yellowing leaves or stunted growth—these are your cues to adjust feeding.
Prepare for the Transplant Stage
The final stage before transplanting outdoors occurs when seedlings are 4-6 weeks old and have developed 5-7 sets of true leaves. The plant should be 12-18 inches tall with a sturdy stem that can support itself. This is when you'll start seeing flower buds forming at the leaf axils.
Two weeks before your last frost date, begin the hardening-off process. Place seedlings outside in a sheltered, shaded spot for 1-2 hours the first day, gradually increasing outdoor time by 1 hour daily over 10-14 days. This slow introduction to outdoor conditions prevents transplant shock.
You'll know seedlings are ready for transplant when they tolerate a full day outside without wilting. Transplant on an overcast afternoon to reduce stress. Water deeply at the base to encourage root establishment in their new home.
Monitor Post-Transplant Growth
After transplanting, focus on the plant's recovery and establishment. You'll see new growth within 7-10 days as the plant adjusts to its new environment. Pay attention to the lower leaves—they may yellow and drop off as the plant redirects energy to new growth.
This is normal and not a cause for concern unless the entire plant wilts or shows signs of disease. Keep the soil consistently moist but not waterlogged, especially during dry spells. Mulch around the base to retain moisture and regulate soil temperature.
As the plant matures, you'll notice the development of fruit clusters at the leaf axils. This is when you'll want to provide support, such as stakes or cages, to prevent the plant from toppling over under the weight of the tomatoes. Regular pruning of suckers (the small shoots that form in the leaf axils) encourages stronger main stems and better fruit production.
Tips & tricks for perfect tomato seedling growth
Tracking tomato seedling growth stages transforms guesswork into confidence—here's how to avoid common pitfalls and maximize success.
Lighting is Everything: In Step 2, when you move seedlings to a bright light source, position the grow light just 2-4 inches above the plants. I've learned the hard way that seedlings will stretch toward weak light, creating those weak, spindly stems you don't want. If you notice seedlings leaning toward one side, rotate the tray daily to ensure even growth. This simple habit prevents leggy seedlings that struggle to support themselves later.
Root Health Check: During Step 3's vegetative growth stage, make it a habit to gently remove one seedling from its container every week to check root development. Healthy roots should be white and spread outward like a network. If you see roots circling tightly or looking cramped, it's time to transplant to a larger container immediately. I always keep a few extra small pots on hand for this exact purpose—it's better to transplant early than wait until roots become tangled.
Hardening Off Strategy: When beginning the hardening-off process in Step 4, start with just 1-2 hours on the first day and gradually increase exposure. I've found that using a small shade cloth during the initial outdoor sessions helps seedlings adjust more comfortably to direct sunlight. Watch for any wilting—if you notice seedlings drooping after just a few hours, they're not ready for that much sun yet. This gradual approach prevents transplant shock that can set back growth by weeks.
Fertilizer Timing: During Step 3, when you introduce that balanced fertilizer, remember to dilute it to half strength. I've ruined seedlings by being too eager with fertilizer, causing those crispy brown edges on leaves. Start with just a quarter teaspoon of fertilizer per gallon of water and observe the plants' response. If you see any yellowing between the veins, that's your cue to reduce the fertilizer concentration even further.
Pro Tips for Tomato Seedling Images
- Tracking tomato seedling growth stages transforms guesswork into confidence—here's how to avoid common pitfalls and maximize success.
- Lighting is Everything: In Step 2, when you move seedlings to a bright light source, position the grow light just 2-4 inches above the plants.
- Root Health Check: During Step 3's vegetative growth stage, make it a habit to gently remove one seedling from its container every week to check root development.
Frequently asked questions
Got questions about tomato seedlings? You’re not alone! Here are answers to the most common queries—whether you’re just starting or troubleshooting your little green sprouts.
How do I know when my tomato seedlings are ready to transplant?
Tomato seedlings are ready for transplanting when they’re 4–6 inches tall, have 4–6 true leaves (not just seed leaves), and their stems are sturdy enough to support themselves. Avoid transplanting too early—wait until nighttime temperatures stay above 50°F (10°C) to prevent shock. Harden them off for 7–10 days first by gradually exposing them to outdoor conditions.
Why are my tomato seedlings stretching tall and leggy?
Leggy seedlings usually mean they’re craving light. Move them to a sunnier spot (south-facing window or grow lights) immediately. If it’s too late, bury them deeper when transplanting—up to the first set of leaves—to encourage root growth. Avoid overcrowding, and use reflective surfaces (like aluminum foil) to bounce light around.
How often should I water tomato seedlings?
Keep the soil consistently moist but not soggy. Water when the top inch feels dry (about every 2–3 days, depending on humidity). Use a spray bottle for gentle watering to avoid disturbing delicate roots. Bottom-watering (placing trays in water) can prevent fungal issues. Avoid wetting leaves to reduce disease risk.
What temperature is too cold for tomato seedlings?
Tomato seedlings thrive in 65–85°F (18–29°C) during the day and above 55°F (13°C) at night. Below 50°F (10°C), growth slows, and they’re prone to damping-off (a fungal disease). If temps drop, use row covers, grow lights, or a heat mat to protect them. Never let them sit in cold drafts or near AC vents.
Can I save tomato seeds from store-bought tomatoes?
Scoop out the gel-like seeds, rinse them in water, and let them ferment in a jar for 2–3 days (the scum that forms helps remove inhibitors). Rinse again, dry on a paper towel, and store in a cool, dark place. Heirloom or non-hybrid varieties (like ‘Brandywine’ or ‘Cherry’) yield the best results—avoid seeds from hybrid tomatoes (marked “F1”).
What should I do if my seedlings get pests like aphids or spider mites?
Act fast! Blast pests off with a strong spray of water or use neem oil (mix 1 tsp per quart of water, spray leaves). For severe infestations, isolate affected plants and repeat every 5–7 days. Introduce beneficial insects (like ladybugs) or use insecticidal soap. Check undersides of leaves—pests love hiding there!
Wrapping up and next steps
Watching your tomato seedlings grow from tiny sprouts to sturdy transplants is one of the most rewarding parts of gardening! 🌱 Whether you’re capturing their progress with tomato seedling images or simply marveling at nature’s magic, each stage brings you closer to a bountiful harvest.
Now that you’ve learned about the key growth phases, it’s time to roll up your sleeves—plant those seedlings with confidence and give them the love they deserve!
Ready for the next step? Transplant your seedlings outdoors (or under grow lights) and keep an eye on their development. Soon, you’ll be snapping photos of lush, thriving plants—and maybe even sharing your success with fellow gardeners! 🌿