Watering
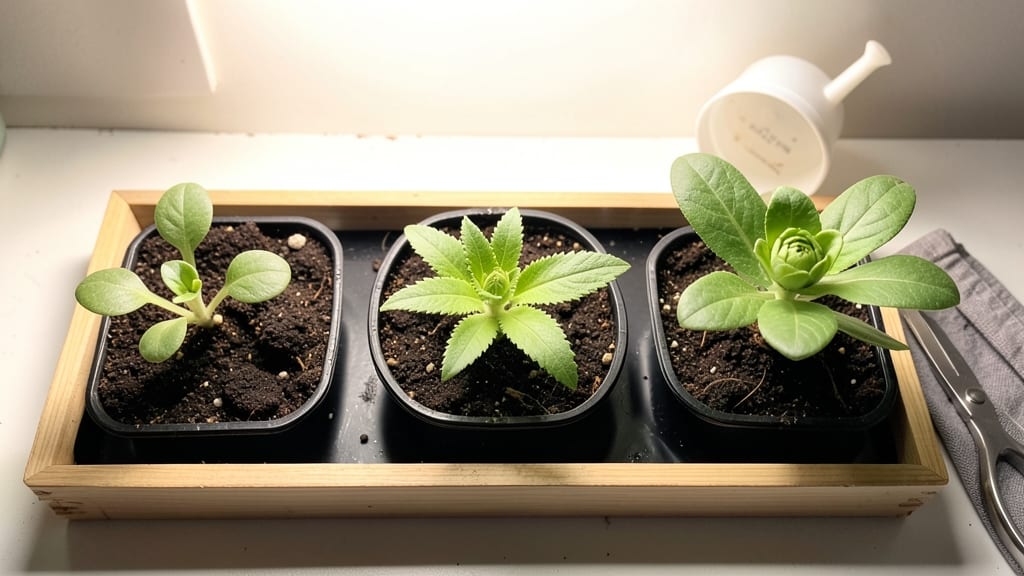
Understanding zinnia seedling stages turns guessing into confidence. 🌱 From the first tiny sprouts to those bold blooms, each phase has its own care needs—and knowing them means stronger plants and bigger flowers.
I’ve tracked these stages for years, and the difference between thriving seedlings and sad, leggy sticks comes down to timing and attention.
The journey starts with germination, when those wrinkled seeds push through the soil in 5-14 days (depending on warmth). True leaves—round and fuzzy—appear next, followed by the first true leaves that look like tiny maple leaves.
This is when you’ll notice height milestones: 1-2 inches tall by week 3, then 3-4 inches by week 4. Each stage demands slightly different watering—too much at this point, and you’ll drown those delicate roots.
By the time seedlings hit 4-6 inches, they’re ready for transplanting if they’ve got 4-6 true leaves. That’s when you’ll see the classic zinnia shape emerge—sturdy stems and vibrant foliage.
The real magic happens after transplanting: with proper light and consistent moisture, you’ll watch those stems thicken and buds form in just 6-8 weeks. No more weak stems or flopping plants—just bold, blooming zinnias that turn heads.
Here’s the thing—most people skip the true leaf stage check, and that’s when problems start. Leggy seedlings? Too little light. Yellowing leaves? Overwatering. But once you recognize these milestones, you’ll spot issues early and fix them before they derail your whole batch.
Let’s break it down so you never miss a stage again.
📚 In This Guide
- What you need
- Instructions
- Tips and common mistakes
- Wrapping up and next steps
What you need
- ● Zinnia seeds: Choose heirloom or hybrid varieties (e.g., 'Benary’s Giant' or 'Profusion'). Start with 5–10 seeds for a small batch or 20–30 seeds for a full garden bed.
- ● Seed-starting trays or pots: 2–4 inch deep with drainage holes. Use 6–12 cell packs for seedlings or 4–6 inch pots for direct sowing.
- ● Seed-starting mix: Lightweight, sterile peat-based or coco coir blend (avoid garden soil—it’s too dense!). A 10–15 quart bag covers most starts.
- ● Watering can or spray bottle: A gentle misting nozzle prevents seed displacement.
- ● Grow lights or sunny windowsill: 12–16 hours of light daily (LED grow lights work best; 12–24 inch height above seedlings).
- ○ Heat mat (optional but helpful): 70–75°F soil temperature speeds germination. A 10x20 inch mat fits most trays.
- ● Fertilizer: Balanced liquid fertilizer (5-5-5 or 10-10-10) diluted to half-strength after true leaves appear.
- ● Transplanting tools: Small hand trowel, biodegradable pots (if hardening off), and gardening gloves for protection.
- ● Humidity dome or plastic wrap: Keeps moisture in until germination (remove once sprouts appear!).
- ● pH test kit: Zinnias prefer 6.0–7.0 pH; adjust soil if needed.
- ● Insecticidal soap or neem oil: Preemptive strike against aphids or spider mites (common pests!).
- ● Garden journal: Track watering, light, and growth stages for future reference!
Step-by-Step visual guide to zinnia seedling development
Watch your zinnias transform from tiny seeds into vibrant blooms—each stage reveals what they need next.
🌱 Step 1: Germination and First True Leaves
Zinnia seeds typically sprout within 7-14 days at 65-75°F, though cooler soil may delay germination. You'll see the first sign—a tiny cotyledon (seed leaf) pushing through the soil surface. These first leaves look round and smooth, unlike the jagged foliage that comes later.
Keep soil consistently moist but not soggy during this phase. Overwatering can cause damping-off, where seedlings collapse at the stem. If you notice blackened stems or wilting, reduce watering and improve airflow immediately. Once both cotyledons unfurl fully, your seedlings are ready for their next growth phase.
🌿 Step 2: Early Vegetative Growth (3-4 True Leaves)
Within 2-3 weeks after germination, your zinnias will develop their first true leaves—these are the jagged, fern-like foliage that defines zinnia plants. At this stage, seedlings should have 3-4 true leaves and a sturdy stem that can support itself without leaning.
This is the ideal time to thin seedlings if you planted multiple seeds per cell. Use clean scissors to snip unwanted stems at soil level, leaving the strongest, most upright plant. Avoid pulling seedlings by hand, as it can damage delicate roots. If transplanting, wait until seedlings have 4-5 true leaves to minimize shock.
☀️ Step 3: Bolting and Flower Bud Formation
When seedlings reach 4-6 inches tall, you'll notice rapid vertical growth—a sign they're bolting. This is when the main stem elongates quickly, and flower buds begin forming at the stem tips. The buds start as tight, green clusters that gradually swell and develop color.
Increase light exposure now—zinnias need 6-8 hours of full sun daily to prevent leggy growth. If grown indoors, supplement with a grow light positioned 4-6 inches above the plants. Pinch back the tips of leggy stems to encourage bushier growth and more blooms. You'll see new side shoots emerge within 7-10 days.
✂️ Step 4: Bud Development and First Blooms
About 6-8 weeks after germination, your zinnias will produce their first open flowers. The buds will unfurl from the bottom up, revealing vibrant petals in colors ranging from fiery red to soft pink. Each bloom lasts 5-7 days before wilting, but continuous pinching encourages new buds to form.
Deadhead spent blooms by snipping the stem just above a set of leaves to redirect energy into new flowers. This keeps your zinnias flowering prolifically throughout the season. If you notice buds forming but not opening, check for aphids or thrips—common pests that can distort flowers. Treat with neem oil if needed.
🌼 Step 5: Maturity and Seed Production
As the season progresses, zinnias will produce seed heads—dry, papery structures that contain hundreds of tiny seeds. These develop after the petals fall, signaling the plant's transition to its reproductive stage. If you're saving seeds, allow the seed heads to fully dry on the plant before harvesting.
At this stage, zinnias may slow their flowering as energy shifts to seed production. To prolong blooms, fertilize lightly with a balanced 10-10-10 formula every 4-6 weeks. If your zinnias are in containers, consider repotting them into larger pots to prevent root-bound stress, which can reduce flowering.
Tips & tricks for perfect zinnia seedling growth
These visual cues and practical strategies will help you navigate each zinnia growth stage with confidence.
Germination Timing: The 7-14 day germination window depends heavily on soil temperature. I've found that maintaining a consistent 75°F soil temperature—using a seedling heat mat if needed—can help you hit the faster end of that range. Place a small thermometer in your seed-starting mix to monitor temperature accurately. If your seedlings take longer than 14 days to emerge, check for moisture levels—seeds need consistent dampness but won't germinate if waterlogged.
Light Exposure Secret: During Step 3 when your seedlings reach 4-6 inches, I recommend supplementing natural light with a grow light for 12-14 hours daily if you're growing indoors. Position the light 4-6 inches above the plants and adjust the height as they grow to maintain proper distance. The key is to prevent leggy growth—those elongated stems indicate insufficient light exposure. You'll notice healthier stems and more compact growth when light conditions are optimal.
Thinning Technique: When thinning seedlings in Step 2, I use a pair of clean, sharp scissors rather than pulling by hand to avoid disturbing the root systems of remaining plants. Cut at soil level and remove the seedlings immediately—leaving them on the tray can lead to fungal growth. This method also prevents the shock that comes from hand-pulling, which can set back your remaining seedlings by several days.
Deadheading Strategy: For continuous blooms in Step 4, I've developed a system of deadheading every 5-7 days—right when flowers begin to wilt. Use clean pruning shears and make your cut just above a set of leaves where new buds are forming. This redirection of energy often results in 2-3 new buds forming at that node within 7-10 days. The key is consistency—don't let more than 20% of your flowers go to seed before deadheading.
Pro Tips for Zinnia Seedling Stages
- These visual cues and practical strategies will help you navigate each zinnia growth stage with confidence.
- Germination Timing: The 7-14 day germination window depends heavily on soil temperature.
- Light Exposure Secret: During Step 3 when your seedlings reach 4-6 inches, I recommend supplementing natural light with a grow light for 12-14 hours daily if you're growing indoors.
Frequently asked questions
Got questions about zinnia seedling stages?
You’re not alone! Here are answers to the most common concerns—from timing to troubleshooting—so you can grow confident, thriving zinnias.
How long does it take for zinnia seedlings to sprout?
Zinnia seeds typically sprout in 7–14 days after planting, depending on temperature and moisture. Keep soil consistently moist (not soggy) and warm (around 70°F) to speed up germination. If you don’t see sprouts in 2 weeks, gently check for seeds—some may need light to germinate!
What do healthy zinnia seedlings look like at each stage?
Here’s a quick visual guide:
- Stage 1 (Germination): Tiny green cotyledons (seed leaves) emerge first—no true leaves yet!
- Stage 2 (True Leaves): Look for 2–4 oval-shaped true leaves (not fuzzy like cotyledons).
- Stage 3 (Stem Growth): Seedlings grow 4–6 inches tall with a sturdy stem and bushy foliage.
- Stage 4 (Bud Formation): Colorful buds appear at the top—this means blooms are coming soon!
How often should I water zinnia seedlings?
Water seedlings daily with 1/4 inch of water to keep soil evenly moist. Avoid overhead watering to prevent fungal diseases like damping off. Once seedlings have 2–3 true leaves, reduce to every 2–3 days (check soil moisture first—top inch should feel dry).
Why are my zinnia seedlings turning yellow or falling over?
Yellowing or leggy seedlings often signal overwatering, poor light, or damping off (a fungal disease). Fix it by:
- Ensuring pots have drainage holes and soil isn’t soggy.
- Moving seedlings to a sunny spot (6+ hours of light daily).
- Thinning crowded seedlings to 1–2 inches apart for better airflow.
- Spraying with a baking soda solution (1 tsp baking soda + 1 quart water) if damping off appears.
Can I transplant zinnia seedlings too early?
Yes! Transplanting too soon (before seedlings have 3–4 true leaves) stresses them, leading to stunted growth. Wait until:
- Seedlings are 2–3 inches tall.
- Night temperatures stay above 50°F (zinnias hate frost!).
- Soil is warm and workable (press your finger in—it should feel like damp sand, not mud).
Wrapping up and next steps
Growing zinnias from seed is a rewarding journey, and understanding each seedling stage ensures vibrant blooms that brighten your garden. 🌱 From those first tender sprouts to full, cheerful flowers, every phase is a testament to your care and patience.
Now that you’re equipped with the knowledge, it’s time to roll up your sleeves and watch your garden transform!
Ready to take the next step? Transplant your sturdy seedlings into the garden once they’ve developed their second set of true leaves—just be sure to harden them off first!
With the right timing and tender loving care, you’ll soon be enjoying a bountiful display of zinnias that’ll make your neighbors green with envy.